|
|

|
Using a Microscope |
|
|
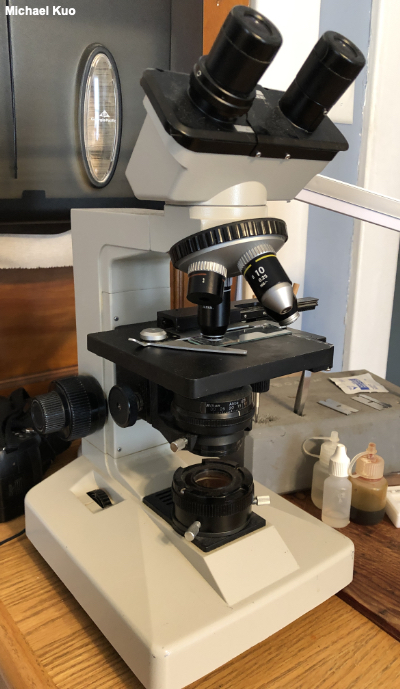
Mushroom Microscopy On the one hand it is frustrating to discover, when trying to identify a mushroom you have found in the woods, that microscopic analysis is required in order to separate it from other mushrooms. On the other hand, microscope work can be fun and rewarding. Many of the techniques required are not that difficult to learn, and a decent used microscope can often be picked up for under $400. The best part is, if you are obsessed with mushrooms and live in an area where they do not come up year-round, you can spend quality time with your little friends in the off season. Studying mushrooms with a microscope takes practice, but new frontiers open up at each level. Beginners will find that simply looking at a mushroom's spores is fascinating, and often helps substantially in the identification process. More advanced microscope skills lead not only to facilitated identification but, sometimes, to stunning views and gorgeous microstructures (would you believe cup fungi, species of Inocybe, and species of Pluteus, for example, are often beautiful?). Plus, how cool will you be? "What are you doing?" someone will ask. "Mushroom microscopy," you'll reply with cavalier confidence. "Mushroom. Microscopy." |

|
|
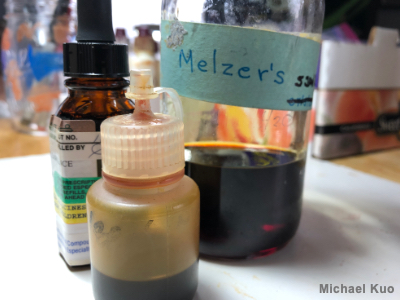
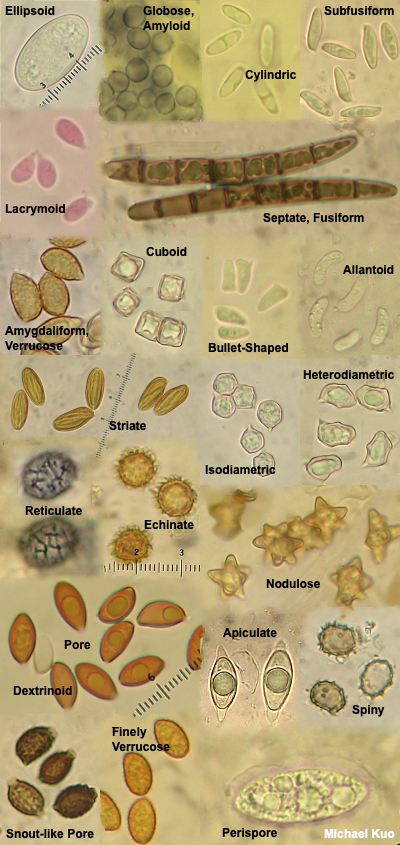
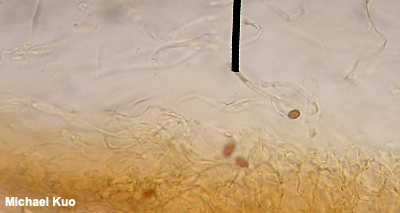
Viewing and Measuring Spores Observing spores, and measuring them, is probably the easiest of the various microscope routines involved in mycology, and it's a good place to start. You will be surprised at how useful it can be in the identification process to know whether a mushroom's spores are smooth, "ornamented," "ridged," or "pitted" (etc.), and to know their dimensions. You want to measure mature spores since, like other parts of a mushroom, spores are little before they are big. The spore sizes quoted in field guides and in technical mycological literature represent mature spores—which, by definition, have fallen off the mushroom. This means that a spore print should be the source of your material. Take a clean, dry razor blade and scrape lightly on the spore print, collecting spore dust on the blade's edge. If you have made a spore print on paper, don't scrape too hard; you will be scraping paper particles as well, which will confuse things under the microscope. I place a piece of glass underneath the paper before I scrape spores from a paper print, to give myself an even and hard surface to work on. Tap the spore dust off the razor blade, onto a clean slide. Place a drop of KOH or Melzer's reagent on the spore dust, add a coverslip, and tap gently on the coverslip with a pencil eraser to coax air bubbles away. Now put the slide on your microscope's stage. Start at low magnification, bringing the spores into focus (they may be very tiny), and move progressively through your magnifications, bringing the spores into focus each time. Carefully add a drop of immersion oil to the top of the cover slip before moving to the highest magnification (your oil-immersion lens), and then turn the coarse focus knob very gently and carefully until your spores slide almost into focus. Use the fine focus knob to make them completely visible. Going from low to high magnification is the only way to first locate the spores and then put them in focus; you probably won't have much luck if you start the process with your oil immersion lens (plus, you make easily break the slide or cover slip by forcing the oil immersion lens too far down). At least one mount of spores should be made in Melzer's reagent. This will allow you to determine whether the spores are amyloid, inamyloid, or dextrinoid, which can be very important information in the identification process. Sketch and describe the appearance of spores in your journal. You can also use a digital camera to take pictures through your eyepiece—and this works better than one might expect, after a little practice. You will have to experiment with your camera's settings. I have pretty good luck when I turn off the automatic flash, zoom my lens just a little bit, and take a whole lot of pictures, pausing to re-adjust the microscope's fine focus frequently. With this method I typically get one or two good shots for every ten I attempt—so you may well discover a more reliable method. If you can't get a spore print out of your mushroom, you may still be able to see spores by taking a small portion of a mature gill and mounting it in a "crush mount" (press on the cover slip with a pencil eraser, gently crushing and stretching out the gill). Under the microscope, search through all of the tissues for spores—but remember that you may be viewing immature spores if you find them. If you can't find spores with this method, odds are high that your mushroom is simply immature, and has not yet developed spores. To measure spores, use the ruler in your eyepiece (converting the values, if necessary, to microns using the multiplier you established when you calibrated your microscope). Be sure your spores are completely in focus; roll the fine-focus knob until the dimensions are as small as they can be. In order to get a good sense of the size of the spores, you will need to measure a bunch of them. How many? You will find different answers to this question, depending on the mycologist. Most will tell you that 10–20 measurements is probably enough. Others suggest more. Others, even more. I doubt my friend Rod Tulloss, the reigning North American Amanita expert, thinks one has ever measured enough spores to be confident about spore sizes. Whatever you decide, record the spore sizes and shapes in your journal, with the other data you recorded about the mushroom. Record the dimensions of the smallest and largest spores you can find—but if these big and little spores seem aberrant (like, there's only one little one amongst hundreds of others), exclude their dimensions from your accounting. If the spores have significant, measurable ornamentation (for example spines), it's best to measure the width or length of the spore without the ornamentation, and measure the ornamentation separately (the spines, for example, may vary in their length). You will want to express the dimensions of the spores as two ranges of possibilities, length and width: for example, 7–9.5 x 4–5.5 µm, which means that the thinnest spore you found was 4 µm wide, the widest was 5.5 µm, the shortest was 7 µm, and the longest was 9.5 µm. |
|
|
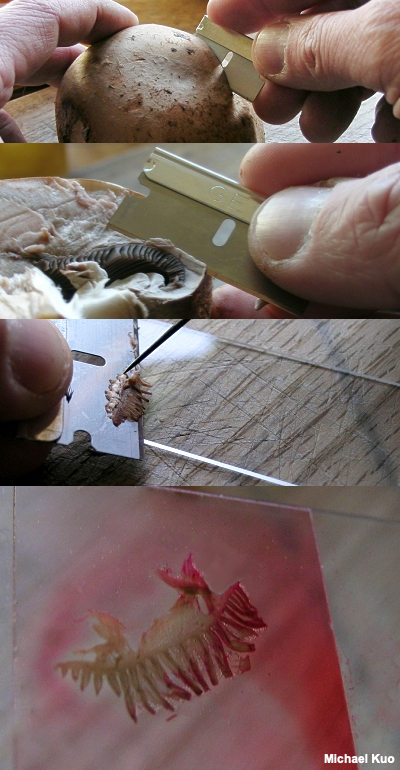
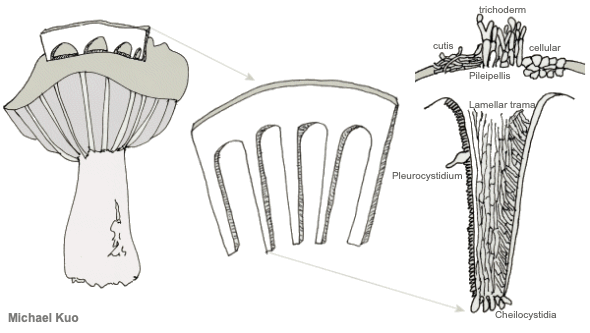
Creating a Section to Study Many of the microscopic structures you will want to observe can be seen by creating a cross-section of the mushroom's cap, with the gills included. Thus, "sectioning a pileus" is one of the most essential and basic routines for studying mushrooms. The concept is illustrated in the graphic below. You are creating a cross-section that contains a bit of the cap surface, the flesh, and several gills—represented by the thing in the middle of the illustration. I call this a "Roman Aqueduct Section," since the section looks a bit like an aqueduct. On the left is the section in relation to the mushroom and its cap; on the right is a schematized diagram of part of the section, under your microscope.
Use good razor blades! Prepare to budget some money for razor blades, because successful sectioning requires super sharp edges. We're talking three or four uses, and it may be time for a new one. You'll have to search around at your drug store to find the old-fashioned, single-edged blades in the little safety boxes. Avoid double-edged blades; they are flimsy and, more importantly, dangerous, since you don't have a nice, safe edge to handle. Step by step The illustrations to the left take you through the process of creating a section like the one schematized above. You will notice that things don't work out so perfectly for me in the photo series--for example, the Agaricus bisporus specimen I'm using has so much flesh in its cap that creating a paper-thin section all the way from the cap surface to tips of the gills would be impossible (for me, anyway), so I have given up and simply used a small piece of the cap's flesh to hold the gill sections together. Also, the section I have cut is too thick to be ideal--but I wanted something that would show up well in the photos. Boletes For boletes, a similar method should be used if you want to study the pileipellis (the cap surface)—but for studying the hymenium, a small sliver of cross-section sliced from the pore surface will usually suffice. Polypores Polypores, especially the tough-fleshed, woody-textured ones, are notoriously difficult to section. Since a Other Mushrooms For other types of mushrooms, you will usually want to create a section from the hymenium. In the jelly fungi this means pretty much any surface of the mushroom; slice a very thin, cross-sliced section (your razor blade must be exceptionally sharp with jelly fungi) and create a "squash mount" by pressing gently on the coverslip with a pencil eraser. The concept is more or less the same for cup fungi, morels, false morels, species of Helvella, and so on; find the hymenium (with the morels, by the way, that means the pits rather than the ridges), slice a very thin section from the surface, and make a squash mount. Puffballs and similar mushrooms usually require only grabbing a tweezers-pinch-full of the mature gleba and mounting the dusty tissue in a crush mount. Crust fungi can be approached more or less like polypores, above. |
|
|
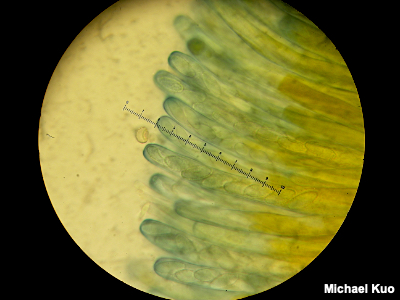
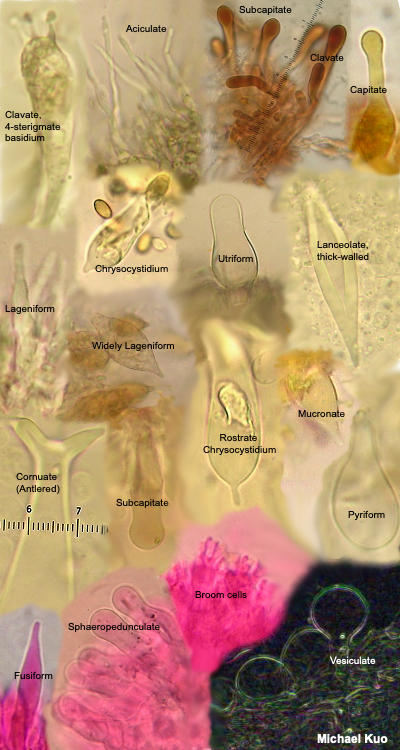
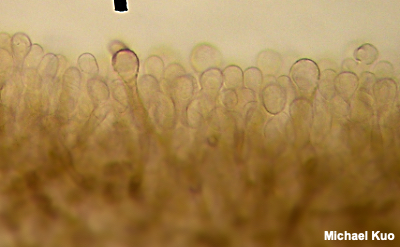
Structures in the Hymenium Basidia Basidia are occasionally distinctive in shape, but they are usually clavate (shaped more or less like inverted clubs). Their length and width (at the widest point) should be measured—but assessing the precise length often involves a little bit of guesswork, since the bases of the basidia are often obscured within the palisade that makes up the hymenium (a crush mount will separate basidia, if you need precise measurements). Also measure the length of the sterigmata (the prongs at the end of the basidium), and count the number of prongs on as many basidia as you can. This can be a little difficult, since basidia are often large enough that their entire depth cannot be brought into focus at once; you will usually need to roll the fine focus knob back and forth to be able to see all the prongs. Between the basidia there may be basidium-like cells that lack prongs and do not hold spores. These are called "basidioles," and they probably represent immature (or aborted) basidia. Analysis of basidioles is not usually relevant to mushroom identification, but I mention them in case they cause confusion. True, spore-bearing basidia have prongs that are almost always large enough to be seen easily with an oil-immersion lens. See also the glossary entry for brachybasidioles, also known as "pavement cells." Cystidia Cystidia are sterile cells that are found, in some mushrooms, popping up between the basidia. Unlike the basidia, cystidia do not produce spores. Their shapes and sizes vary widely between mushrooms—and many mushrooms do not have cystidia at all. Some mushrooms have boring, club-shaped cystidia that are hardly different from the basidia, except for the absence of spore-holding prongs. Others have elaborately ornamented cystidia, thick-walled and enormous cystidia, long and pointy cystidia, and so on. In fact mycologists have given names to many types of cystidia (and, to be accurate, cystidia can occur elsewhere on a mushroom—not just on the hymenium). But no one knows what they are. Don't you love mycology? Um, maybe cystidia hold the gill faces apart so the spores have room to fall? That theory crashes to earth right out of the gate, since plenty of gilled mushrooms lack cystidia and manage just fine. Maybe they hold gills together until the spores are mature? Yeah, and maybe your mail carrier is doing something unproductive on your lawn. I once spent nearly two full days concocting a theory that the little liquid-filled guys are sensors that expand or contract with temperature changes (or changes in humidity) and transmit the information to the basidia so that spores are produced in optimal conditions . . . then I ran out of coffee, thank God. Pleurocystidia are found on the faces (the sides) of the gills, while cheilocystidia are found on the edges of the gills. The only way to be sure of which kind of cystidia you're looking at is to have created a section, like the Roman aqueduct section described above, that will orient your perspective. Cystidia can be seen (if a mushroom has them) by simply creating a crush mount of a small piece of a gill. But you will only be able to distinguish and compare pleuro- and cheilocystidia by creating orientation. In boletes, the pleurocystidia are found on the inside walls of the tubes, while cheilocystidia appear on the edges of the tubes (where the pore is). Hymenial structures for members of the Ascomycota (like cup fungi, morels, false morels, and species of Helvella) are discussed and illustrated in the glossary entries for paraphyses and asci. |
|
|
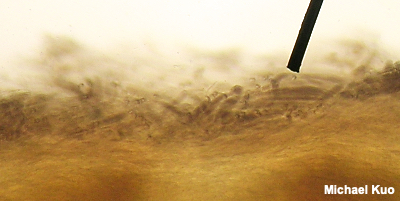
The Pileipellis In order to observe the cap surface of a mushroom, you will need to have sectioned your material in such a way as to facilitate your view. The Roman aqueduct section described above often works to see the pileipellis clearly, but it can obscure your view in the case of a cutis (see below), since the hyphae are arranged so that they radiate away from the cap center, and the sectioning method slices them in cross-section. Thus a radial section is sometimes preferable; make your cuts parallel to the gills, rather than across them. Cutis, Ixocutis A cutis is a type of pileipellis in which hyphae are arranged more or less parallel to the cap's surface, radiating outward from the center of the cap. Occasional hyphal ends (terminal cells) protrude from the surface, usually at a very small angle, sticking up only a little bit; these are often referred to as "exserted ends." (Truly projecting, well-differentiated, sticking-up things constitute pileocystidia.) When observing a cutis, measure the width of the hyphae, note the color of the hyphae in your mounting medium and whether the surface of the hyphae is smooth or not (see for example the encrusted hyphal elements illustrated to the left); also describe the terminal cells, if they are differentiated—and, finally, search for clamp connections at the septa. An ixocutis is one in which the hyphae are partially gelatinized as a result of the mushroom being viscid; in an ixocutis one often sees poorly-defined hyphae that appear to be swimming in an amorphous, hard-to-define material. However, the extent of the gelatinization can vary considerably, and sometimes it can be difficult to determine whether you're looking at a cutis or an ixocutis. In such cases it may help to know that an ixocutis has often accumulated a lot of debris as a result of stuff adhering to the slimy cap surface; search for messy areas and look for signs of gelatinization in them. Trichoderm, Epithelium, Palisadoderm, Ixotrichoderm In a trichoderm the hyphae arise perpendicular to the cap surface. This type of pileipellis can be viewed with equal ease in a Roman aqueduct section or a radial section. When observing a trichoderm, measure the width of the hyphae, note the color of the hyphae in your mounting medium and whether the surface of the hyphae is smooth or not—and describe the terminal cells, which will definitely be differentiated in a trichoderm, since they are upright. The terminal cells may be merely cylindric (see the illustration accompanying the glossary entry for pileipellis), or they may become swollen into various shapes. If the terminal cells are consistently swollen and frequently septate, the pileipellis is sometimes called an epithelium or palisadoderm (see Xerocomus illudens). In an ixotrichoderm the hyphae are gelatinized (see Hygrocybe glutinipes for an example). As with an ixocutis (see above), the gelatinization is sometimes difficult to determine. In a hyphoepithelium, a trichoderm is covered by a very thin, cutis-like layer. In a lamprotrichoderm the upright elements are thick-walled, elongated, and pointed (see Lactarius subvellereus var. subdistans). Hymeniform pileipellis, cellular pileipellis A hymeniform pileipellis is one in which the hyphae are club-shaped and arise perpendicular to the cap surface; they are inflated and resemble immature basidia in a palisade. A hymeniform pileipellis can be viewed with either a Roman aqueduct section or a radial section. A pileipellis is sometimes called "cellular" when it appears to consist of swollen cells; a hymeniform pileipellis, for example, will appear "cellular" when viewed from above. |

|
References Hesler, L. R. and Smith, A. H. (1963). North American Species of Hygrophorus. Knoxville: U Tennessee P. 416 pp. Largent, D. L., Johnson, D. & Watling, R. (1973). How to identify mushrooms to genus III: Microscopic features. Eureka, CA: Mad River Press. 148 pp. Smith, A. H., Smith, H. V. & Weber, N. S. (1979). How to know the gilled mushrooms. Dubuque, Iowa: Wm. C. Brown. 334 pp. Smith, A. H., Smith, H. V. & Weber, N. S. (1981). How to know the non-gilled mushrooms. Dubuque, Iowa: Wm. C. Brown. 324 pp. Smith, A. H. & Thiers, H. D. (1971). The boletes of Michigan. Ann Arbor: U Michigan P. 428 pp. |
|
This site contains no information about the edibility or toxicity of mushrooms. Kuo, Michael (2019). Using a microscope. Retrieved from the Mushroomexpert.Com website: www.mushroomexpert.com/microscope.html All text and images © , Mushroomexpert.com |